

Like many people, I often find myself unconsciously tapping my feet, whether it’s along to a song or out of some nervous habit. As fun as that is though, I’ve always felt as if something has been missing. If only I could trigger the sounds of say, a rabid pack of furious jungle beasts instead of those boring old toe taps. Or, you know, drum sounds or something. I guess that’s cool too.Well, now my dreams have been realized! In this instructable I’ll show you how to go about making a pair of awesome musical shoes.I’ve entered these in the Art of Sound contest, so, you know, feel free to vote for me!
Step 1: Materials: What You’ll Need

Bill of Materials4 Force Sensitive ResistorsA lot of DIY drum pads have been made with piezoelectric transducers, but in my experience these are unreliable at best. For straight up drum pads they might work ok, but in shoes the sensors are always under a certain amount of pressure, they’re not just experiencing brief impacts. Piezos are frustratingly delicate and unpredictable. They crack and bend easily, and the wires to which they are typically attached are usually pretty flimsy.So, instead, you should use FSRs, or Force Sensitive Resistors. These components are easy-to-use, durable, and more reliable than piezos, at least in this application. Basically, the more pressure you apply to an FSR, the less resistive it becomes. Initially, it has infinite resistance, meaning it acts like a break in the circuit. I bought mine from adafruit. There are certainly other vendors, but I have no idea how and/or if they differ. 1 Pair of ShoesYes, this would seem to speak for itself, but there are actually a couple things to take into consideration. For my shoes I used a pair of thrift store skate shoes, the kind with a lot of padding in the heel. This is important, because you need something to conceal the jacks that you’ll install in the heel. Otherwise, your shoes are going to be pretty uncomfortable. For this reason, I wouldn’t recommend using thin-walled shoes like dress shoes, unless you want to add additional padding. Also, try to pick a shoe that has a rigid material on the outside of the heel, as this will make mounting the jacks much easier.4-6 10Kohm ResistorsThese are pull-down resistors that will each be connected to ground and one end of each FSR.1 ArduinoThe Arduino is an open source microcontroller – it enables communication between the FSRs and your computer. They are available from numerous vendors. If you’ve never done any programming before you might want to check out some of the tutorials.1 Project BoxThis will house the Arduino and serve as an interface between the shoes and computer. You can order a project box online, buy one at Radioshack, or use something you already have lying around that is more or less box-like.8-10 1/8″ Mono/Stereo JacksYou only have two heels and two toes, but the Arduino has six analog inputs, so you might as well give yourself the option of using those at some point in the future. Four of these jacks will go in your shoes, and the other 4-6 in the project box. You can get them from Radioshack, Digi-Key, and many other places.4-6 1/8″ Mono/Stereo Cables…for connecting the shoes to the interface. You’ll find them at most electronics-type stores, like Radioshack, Best Buy, or Future Shop. I’m sure you can order them online, too.1 USB Cable…for connecting the Arduino to your computer.1 Roll of Electrical Tape…for securing the sensors in the shoes.Mad Foot-tapping Skillz…quantities may vary.
Step 2: The Interface


You can do this project with just a breadboard and the Arduino, but for the sake of tidiness and portability, you should build a little interface. All you need to do is mount the Arduino in a project box, drill 4-6 (dependent on how many sensors you want to use) holes for the 1/8″ audio jacks, one hole for an LED, and a square hole for the Arduino’s USB jack. Then solder everything up and you’ll be good to go!
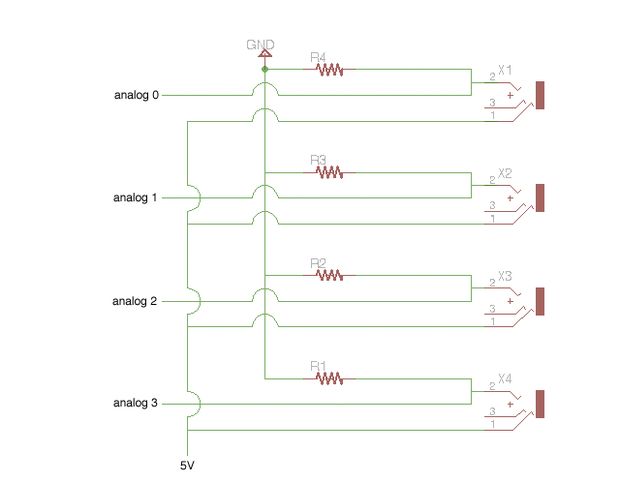
Each audio jack in the interface should have a 10K resistor and a lead for analog input connected to one terminal, and a lead for the 5V supply connected to the other. What terminals you use will depend on whether you have a mono or stereo jack. Both will work, stereo will just provide an additional, unnecessary terminal. The way this works is, we apply 5V across the FSR, so when we press it, it allows a little bit through, and the Arduino can look for this and send a signal to the computer.
Now, grab your soldering iron, some hookup wire, follow the schematic and the diagram, and you’ll be fine.
You could definitely add a lot of extra LEDs and whatnot to this box, i.e. one for every sensor or something. Additionally, it would be pretty straightforward to make a very simple shield for the Arduino using a protoboard and six or so male header pins. You could even get a more robust one made professionally by some PCB company on the interwebs. The prototype shown in this instructable is a pretty basic setup, so there’s lots of room left for expansion (literally, there’s plenty of free space in that box).
Step 3: Shoe Surgery


Show All 9 Items
So, with these padded skate shoes, you’re going to have to perform a little dissection to mount the jacks in the heels.
In the shoes that I used, the heel padding was contained by a mesh-like material stitched to the sole of the shoe. So first, see if you can pry the top layer of the sole out temporarily, so you can get at the stitching which attaches this mesh stuff to the shoe. Once you have access to it, just start cutting. Don’t completely remove the stuff if you plan on replacing the padding at the end. Just cut where the mesh has been stitched to the sole. An exacto knife should work just fine.
Once you’ve liberated the padding, take a look at the outer heel material. You need to drill two holes in the heel, but whatever you do, don’t use a drill press. Since the material is probably still quite flexible, if anything were to get caught, there would be a whole mess of twisting, flailing sneaker. Just use a hand drill and a bit of elbow grease. The bit you use should be a little larger than the diameter of the jack.
With your holes drilled, install the jacks and screw the nuts and washers on tight. You’ll almost certainly have to use some glue to secure them. Epoxy or super glue should do the trick just fine. Apply some glue around the exterior of the jack’s barrel and the inside of the hole and stick ’em together.
Now, tape the FSRs to the inside of the shoes. Be careful with the FSRs, the leads on them will hold up just fine as long as you don’t twist them too much – they don’t handle torsion well. If you plan on gluing them down permanently, hold off for now. Sensor placement is very important and it depends on the size and shape of your feet, as well as your unique foot-tapping style.
With the electronics installed, put the padding back behind the mesh, and find some way of reattaching the mesh to the inside of the shoe. I glued some velcro to the mesh and to the shoe, so that I can open it up and perform maintenance if the need arises.
Now, just plug your shoes into the interface. You’re ready to do some Arduino programming!
Step 4: Programmin’

There is a surprising amount of information online on how to program an Arduino for use with DIY drum triggers. Google will tell you so. I learned a great deal from looking at the code of todbot, adafruit, mschaff, and Spikenzie Labs. I also received considerable input from the always effervescent W. Xavier Snelgrove.So, you could use MAX/MSP/Jitter or Pure Data to process the signals from the Arduino, and that might actually give you more flexibility (I’ll try to post some info on this soon), but instead there’s a really great little application out there called Serial-MIDI Converter. It does just what you might think – converts signals sent over a serial connection to MIDI. It works with any MIDI-compatible program such as Garageband or Ableton Live. Click on the link and download it, all the info on how to use it is right there on the download page. Like I said, if you’ve never used or programmed an Arduino before, you really should check out the Getting Started section on the official Arduino site, as well as their tutorials.The code is commented, so I won’t explain it in detail, I’ll just post the sketch here at the bottom of the page. Basically, you just set a lower and upper threshold for each sensor. If the upper threshold is exceeded, a MIDI message is triggered, and once the force sinks below the lower threshold, another hit can be triggered. It’s called hysteresis, and it makes sure that you don’t set off multiple messages per hit. You may have to fiddle around with the thresholds, depending on your personal foot-tapping style and weight distribution.

midishoes.pde3 KB
Step 5: Testing and Playing
Yay!Woo, now you have musical shoes! Mess around with the placement of sensors, the impact thresholds, whatever, just make some noises and enjoy yourself. Entertain others, impress at parties, charm the young woman/man of your fancy. It’ll be all like BOOSH BOOSH WHAM BOOOSH BOOSH WHAM SPLASH – and then like BIP BOP. BLEEP BLOP. BING BONG. Like, so awesome, guys.Links!todbotadafruitArdrumo Spikenzie LabsW. Xavier SnelgroveSimilar project from Andrew Schneider at NYUMe!

